How to Migrate to Office 365
Planning to migrate your email to Microsoft 365/Office 365?
Here are the standard steps - plus a big money-and-time-saving tip
Migrating email to Office 365, or Microsoft 365 as it’s now known, may seem daunting at first. But if you break the process down into smaller parts, or stages, it becomes much easier. The following guide takes you through how to perform a staged migration over time to move your users’ mailboxes from your on-premises Exchange Server to Microsoft 365. If you want to make the easiest possible job of it though, consider using an email archiving solution. Here’s why:
Cut up to 70% off time and cost of migration
Before going ahead with your migration, look into an email archiving solution that can help you - Cryoserver. It cuts up to 70% off the time and cost associated with migrating to Office 365 email. You don’t need to move all your email data - which could be as much as 10 years’ worth, if not more - to Microsoft 365. With Cryoserver, you can migrate only a fraction of it - say, just one year’s worth. Find out more about Cryoserver.
Now, here are the standard steps to migrating email to Office 365.
Task 1. Get ready for your staged migration
To prepare for migrating to Office 365 email, there are certain changes you need to make to your on-premises Exchange Server environment. Just follow these five steps:
Step 1. Configure Outlook Anywhere (also known as RPC over HTTP)
Office 365’s email migration service uses Outlook Anywhere to connect to your on-premises Exchange Server.
Important: You must use a certificate issued by a trusted certification authority with your Outlook Anywhere configuration. You can’t configure Outlook Anywhere with a self-signed certificate.
Step 2. Make sure you can connect to your Exchange organisation using Outlook Anywhere (this is optional)
Try one of the following:
- Use Outlook from outside your corporate network to connect to your on-premises Exchange mailbox.
or
- Test your connection settings with the Microsoft Exchange Remote Connectivity Analyzer, using the Outlook Anywhere (RPC over HTTP) or Outlook Autodiscover tests.
or
- Wait until later on, when you connect Microsoft 365 to your email system and the connection is tested automatically.
Step 3. Set permissions
In order to access the on-premises mailboxes that you want to migrate to Microsoft 365, you must have the necessary permissions in the on-premises user account that you use to connect to your on-premises Exchange organisation (also known as the migration administrator). You’ll need this user account later on, when connecting Microsoft 365 to your email system.
Step 4. Check the admin permissions
Before you can migrate mailboxes, the admin needs to be either:
- Assigned the FullAccess permission for each on-premises mailbox, and have the WriteProperty permission to modify the TargetAddress property on the on-premises user accounts.
or
- Assigned the Receive As permission on the on-premises mailbox database that stores user mailboxes, and the WriteProperty permission to modify the TargetAddress property on the on-premises user accounts.
Step 5. Turn off Unified Messaging (UM):
Before migration, UM needs to be off for the on-premises mailboxes you want to migrate. After the migration has been completed, turn on the UM.
Task 2. Confirm the domain is yours
During your migration, in order to create email addresses for new Microsoft 365 mailboxes, the Simple Mail Transfer Protocol (SMTP) address of each on-premises mailbox is used. For a staged migration, you must verify that you own the on-premises domain in your Microsoft 365 organisation. Use the domains wizard to verify this, by following these 8 steps (You must be a global admin in Microsoft 365 to complete them):
Step 1. Sign in to Microsoft 365 with your account.
Step 2. Choose ‘Setup > Domains’.
Step 3. Arriving on the ‘Manage domains’ page, and click ‘Add domain’ to start the domain wizard.
Step 4. Arriving on the ‘Add a domain to Microsoft 365’ page, choose ‘Specify a domain name and confirm ownership’.
Step 5. Type in the domain name you use for your on-premises Exchange organisation, and then tap ‘Next’.
Step 6. Arriving on the ‘confirm that you own <your domain name>’ page, find your Domain Name System (DNS) hosting provider from the list or select ‘General Instructions’, if applicable.
Step 7. Do as asked for your DNS hosting provider. Usually, the TXT record ischosen to confirm domain ownership.
After adding your TXT or MX record, wait approximately 15 minutes beforecontinuing on to Step 8.
Step 8. Go to your Microsoft 365 domain wizard and choose ‘done, verify now’. A verification page should appear (if you don’t see this page, wait a bit, and then try again).
Tap ‘Finish’.
You’ve now verified that you own the on-premises Exchange organisation domain. This means you can carry out your email migration.
Task 3. Create users in Microsoft 365 with directory synchronisation
Directory synchronisation allows you to create all the on-premises users in your Microsoft 365 organisation. After creating the users, you’ll need to license them, and you’ll have 30 days to add licences. Read about how to add license further down in this post.
How to create new users
To synchronise and create your on-premises users in Microsoft 365, use either the Microsoft Azure Active Directory synchronisation Tool or the Microsoft Azure Active Directory Sync Services (AAD Sync). After you’ve migrated mailboxes to Microsoft 365, you'll manage user accounts in your on-premises organisation and they’ll be synchronised with your Microsoft 365 organisation.
Task 4. Make a list of mailboxes you want to migrate
When you’ve selected the on-premises mailboxes that you’re migrating to Office 365, you'll need to create a migration batch with a comma-separated value (CSV) file. Each row in the CSV file, which Microsoft 365 uses to run the migration, contains data about an on-premises mailbox.
You can migrate as many mailboxes to Microsoft 365 as you want - there’s no limit. However, there is a maximum of 2,000 rows that the CSV file for a migration batch can contain. If you need to migrate more than 2,000 mailboxes, simply create additional CSV files, using each of them to create a new migration batch.
Which attributes does a CSV file support?
The CSV file for a staged migration supports the following three attributes. Each row in the CSV file corresponds to a mailbox and must contain a value for each of these attributes.
EmailAddress (required)
This identifies the primary SMTP email address (e.g. anemployee@yourcompany.com) for an on-premises mailbox. Use it and not user IDs from Microsoft 365. For example, if the on-premises domain is yourcompany.com but the Microsoft 365 email domain is service.yourcompany.com, you’d use the yourcompany.com domain name for email addresses in the CSV file
Password (optional)
This is the password to be set for the new Microsoft 365 mailbox. If you apply any password restrictions to your Microsoft 365 organisation, you must apply the same restrictions to passwords included in the CSV file.
ForceChangePassword (optional)
This stipulates whether users must change their password when they log in to their new Microsoft 365 mailbox for the first time. Make the value of this parameter True or False.
Important: If you've applied a single sign-on solution by deploying Active Directory Federation Services (AD FS) 2.0 (AD FS 2.0) or greater in your on-premises organisation, you must use False for the value of the ForceChangePassword attribute.
The CSV file format
Bearing in mind the above instructions, here's an example of how the CSV file is formatted, with three on-premises mailboxes being migrated to Microsoft 365.
The CSV’s first row, or header row, lists the names of the attributes, or fields, specified in the rows that follow. Note that a comma separates each attribute name.
CSV
EmailAddress,Password,ForceChangePassword
apatel@yourcompany.com,Pa$$w0rd,False
jsmith@yourcompany.com,Pa$$w0rd,False
liwang@yourcompany.com,Pa$$w0rd,False
Each row under the header row contains the information for one user. This data is essential to migrate the user's mailbox. Make sure the attribute values in each row are in the same order as the attribute names in the header row.
Create the CSV file using any text editor, or an application such as Excel. Save it as a .csv or .txt file.
Recommended: if there are non-ASCII or special characters in the CSV file, save the file with UTF-8 or other Unicode encoding. Depending on the application, saving the CSV file with UTF-8 or other Unicode encoding may be easier when the system locale of the computer matches the language used in the CSV file.
Task 5. Connect Microsoft 365 to your current email system
Your migration endpoint should contain the settings and credentials needed to connect the on-premises server hosting the mailboxes that you're migrating, with Microsoft 365. For a staged migration, you need to create an Outlook Anywhere migration endpoint and use it for all of your migration batches.
How to create a migration endpoint in 9 steps
Step 1. Go to your Exchange admin center.
Step 2. Go to ‘Recipients > Migration’.
Step 3. Choose ‘More
> Migration endpoints’.

Step 4. On the ‘Migration endpoints’ page, choose ‘New
Step 5. Arriving on the ‘Select the migration endpoint type’ page, choose ‘Outlook Anywhere > Next’.
Step 6. On the ‘Enter on-premises account credentials’ page, type in this information:
- The email address of any user in the on-premises Exchange organisation that will be migrated. Microsoft 365 will test the connectivity to this user's mailbox.
- An account with privileges: the username (domain\username format or an email address) for an account that has the necessary administrative permissions in the on-premises organisation. Microsoft 365 will use this account to detect the migration endpoint; it will also test permissions assigned to this account by trying to access the mailbox with the email address you have specified.
- The password for the account with privileges that is the administrator account.
Step 7. Choose ‘Next’ and then do one of the following:
- If Microsoft 365 has successfully connected to the source server and the connection settings are displayed, choose ‘Next’.
- If your attempt to connect to the source server is unsuccessful, type in the following information:
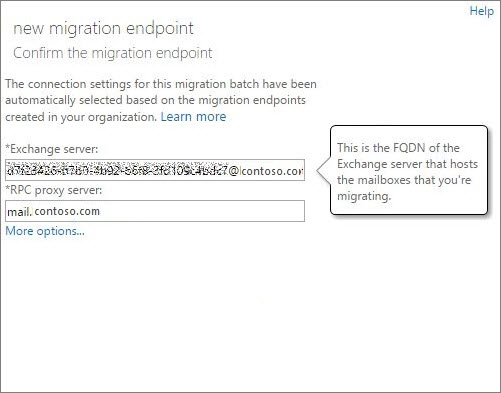
- The fully qualified domain name (FQDN) for the on-premises Exchange Server. This is the host name for your Mailbox server; for example, EXCH-SRV-01.corp.yourcompany.com.
- The FQDN for the RPC proxy server for Outlook Anywhere. Normally, the proxy server is the same as your Outlook on the web (‘Outlook Web App’, as it used to be known) URL - e.g. mail.yourcompany.com, which is also the URL for the proxy server that Outlook uses to connect to an Exchange Server
Step 8. On the ‘Enter general information’ page (see below), type a *Migration endpoint
name*, for example, Test5-endpoint. Leave the other two boxes blank to use the default values.

Step 9. Choose ‘New’ to create your migration endpoint.
Task 6. Migrate users’ mailboxes
To migrate mailboxes to Microsoft 365 in a staged migration, you need to create and then run a migration batch - one for each CSV file you created.
How to create a staged migration batch in 10 steps
Step 1. Go to your Exchange admin center and navigate to ‘Recipients > Migration’.
Step 2. Choose ‘New > Migrate to Exchange Online’.

Step 3. Arriving on the ‘Select a migration type’ page, choose ‘Staged migration > next’.
Step 4. On the ‘Select the users’ page, choose ‘Browse’ and pick the CSV file to use for this migration batch.
After you’ve selected a CSV file, Microsoft 365 will check it to make sure that:
- The file isn't empty.
- The file uses comma-separated formatting.
- The file doesn't have more than 2,000 rows.
- The file includes the EmailAddress column in the header row.
- All rows contain the same number of columns as the header row.
If any of the above checks fails, Microsoft 365 will give you an error message explaining why the check has failed. You will need to fix any errors in the CSV file and then try creating a migration batch with it again. When your CSV file has been validated, you’ll see the number of users listed in the CSV file displayed as the number of mailboxes to be migrated.
Step 5. Choose ‘next’.
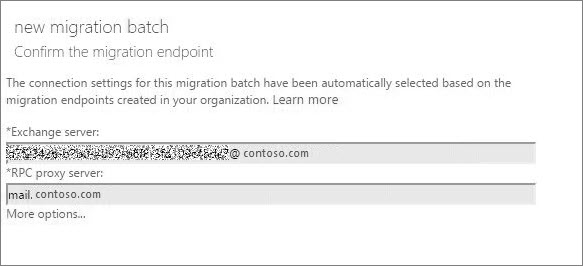
Step 6. Arriving on the ‘Confirm the migration endpoint’ page, make sure the migration endpoint information that is listed is correct (see below), and then choose ‘next’.
Step 7. Arriving on the ‘Move configuration’ page, type the name - without spaces or special characters - of the migration batch, and then choose ‘next’. This name will be shown in the list of migration batches on the ‘Migration’ page after you have created the migration batch.
Step 8. On the ‘Start the batch’ page, choose one of these options:
- ‘Automatically start the batch’: The migration batch will start as soon as you save the new migration batch. Its status will be ‘Syncing’.
- ‘Manually start the batch later’: The migration batch will have been created but not started. Its status will be ‘Created’. To start a batch, select it on your migration dashboard and then choose ‘Start’.
Step 9. Choose ‘new’ to create the migration batch.
The new migration batch will be displayed on the migration dashboard.
Task 7. Start your staged migration batch
When you create a migration batch, if you configure it to be manually started, you can do this in the Exchange Admin center. Just follow these three steps:
Step 1. Go to ‘Recipients> Migration’.
Step 2. Arriving on the migration dashboard, select the batch for migration, and then choose ‘Start’.
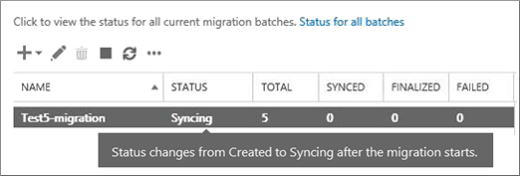
Step 3. If a migration batch starts successfully, its status on the migration dashboard changes to ‘Syncing’ (see below).
Now check the migration has succeeded
Keep an eye on the sync status in your migration dashboard. If there’s a problem, you can view a log file to get information about any errors.
You can also check that users are created in the Microsoft 365 admin center during the migration.
Task 8. Enable migrated users to access their email: convert on-premises mailboxes to mail-enabled users
So, you’ve succeeded in migrating a batch of mailboxes. Now you need to let users access their mail. A migrated user now has two mailboxes: their old on-premises one and their new Microsoft 365 mailbox. The user will stop getting new emails in their on-premises mailbox.
As you still have other on-premise mailboxes to migrate, you’re not in a position to direct all users to Microsoft 365 for their email. So you may wonder what to do about users who have both types of mailbox. A solution is to change the on-premises mailboxes that have been migrated to mail-enabled users. When you do this, you can tell users to access their emails via Microsoft 365 instead of their on-premises mailbox.
Here’s another reason to convert on-premises mailboxes to mail-enabled users: you can retain proxy addresses from the Exchange Online mailboxes by copying proxy addresses to the mail-enabled users. This way, you can use Active Directory to manage cloud-based users from your on-premises organisation. In addition, if you go on to decommission your on-premises Exchange organisation after migrating all mailboxes to Exchange Online, the proxy addresses you've copied to the mail-enabled users will remain in your on-premises Active Directory.
Time for your next migration?
Just follow the steps above to migrate another batch of users’ mailboxes, either running multiple batches at the same time or one by one - whatever suits your schedule and your users’ needs. It’s important to remember this though: you must not have more than 2,000 mailboxes per migration batch.
When all of your users are migrated to Microsoft 365, then email can be sent directly to Microsoft 365, and you can decommission your old on-premises email system.
How to reduce email delays
After you’ve migrated your on-premise mailboxes, when emails are sent from external email systems to your organisation, there could be a delay before they are received. This is because the external email systems don’t know that the location of your email system has changed. They have saved your system’s location based on a setting called a “time-to-live” (TTL) in your DNS server. You can prevent the mail delivery delay by reducing the TTL that your DNS server gives to external servers. This will lead to external organisations refreshing the location of your email system more frequently - so that they’re more up to date with your organisation.
Microsoft recommends that you set the TTL to a short interval of 3,600 seconds (one hour) or less - before starting your email email migration. Then, external systems will ask for an updated location every hour or less. When you have completed your staged migration to Office 365, you can change the TTL back to a longer interval.
You can change your TTL setting on your email system's mail exchanger record, which is also known as an MX record. You’ll find this on your public facing DNS system. If you have more than one MX record, change the figure on each to 3,600 or less.
Task 9. Route email directly to Microsoft 365
In order to deliver emails to the correct destinations, email systems use a DNS record called an MX record. When you were carrying out your migration, your MX record was directed to your on-premises email system. Now that you’ve migrated all of your users, you need to redirect your MX record to Microsoft 365. Only after you’ve moved the MX record can you turn off your old email system.
It can take up to 72 hours for external organisations’ email systems to recognise the change you’ve made to your MX record. You need to wait at least this long before going on to Task 10.
Task 10. Delete your staged migration batch
Do this task after you’ve changed your MX record and confirmed that all emails are being sent to Microsoft 365 mailboxes. Then it’s safe to delete your staged migration batches. Before deleting any though, confirm the following:
- Make sure all of the batch’s users are now using their Microsoft 365 mailboxes. Once you delete the batch, then mail sent to your on-premises Exchange Server mailboxes won’t be copied to the corresponding Microsoft 365 mailboxes.
- Also verify that Microsoft 365 mailboxes were synchronised at least once after mail started to be sent directly to them. To do this, check to see that the value in the ‘Last Synced Time’ box for the migration batch is more recent than when mail started to be sent directly to Microsoft 365 mailboxes.
When you delete a staged migration batch, it is taken off the list of migration batches on the migration dashboard.
How to delete the staged migration batch in 4 steps
Step 1. In your Exchange admin center, go to ‘Recipients > Migration’.
Step 2. Select the batch, and then choose ‘Delete’. It may take a few minutes for the batch to be deleted.
Step 3. In the Exchange admin center, go to ‘Recipients > Migration’.
Step 4. Confirm that the migration batch is no longer listed on your migration dashboard.
Task 11. Do post-migration tasks
When you have completed your migration to Microsoft 365, you must do the following post-migration tasks.
- Assign a licence to activate user accounts for the migrated accounts. Without an assigned licence, Microsoft will disable the mailbox after 30 days.
- Make an Autodiscover DNS record to help users get to their mailboxes. After you’ve migrated all on-premises mailboxes to Microsoft 365, you can configure an Autodiscover DNS record for your Microsoft 365 organisation. This will enable users to connect to their new Microsoft 365 mailboxes easily with Outlook and mobile clients. This new Autodiscover DNS record needs to use the same namespace that you use for your Microsoft 365 organisation. For example, if your cloud-based namespace is cloud.yourcompany.com, the Autodiscover DNS record you need to create is autodiscover.cloud.yourcompany.com.
Microsoft 365 uses a CNAME record to implement the Autodiscover service for Outlook and mobile clients. The Autodiscover CNAME record must contain the following information:
- Alias:autodiscover
- Target:autodiscover.outlook.com
- Decommission on-premises Exchange servers. You can uninstall Exchange when you've confirmed that:
- All email is being sent directly to your Microsoft 365 mailboxes.
- The migration has been completed.
- You no longer need to maintain your on-premises email organisation.
Important
Decommissioning Exchange can have unintended consequences. Before you decommission your on-premises Exchange organisation, please contact Microsoft Support.
Cryoserver makes migrating to Office 365 easier
Cryoserver is an email archiving solution that enhances Microsoft 365. Independent from your mail server, it streamlines migration, cutting up to 70% off the cost and time associated with migrating email to Office 365. It offers you data capture and import utilities that manage your legacy email data, reducing the volume of data to be migrated. And, when you’ve completed your migration, Cryoserver will:
- Store every email sent and received by your organisation
- Make archived emails available to all users via Outlook
- Replicate your Outlook email folders within the Cryoserver interface
- Search faster and more accurately for emails in Outlook, so that users can find them in seconds
Find out more about Cryoserver